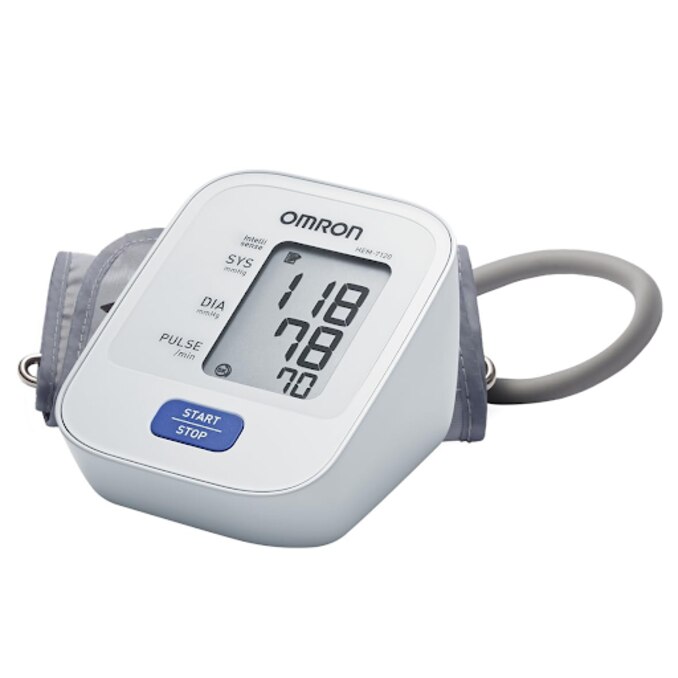
Accurate home blood-pressure tracking depends on more than pressing a start button: cuff size, body position, timing, and the way you record results all affect the number on the screen. By the end, you will know how to choose a suitable monitor, take repeatable readings, recognise misleading results, and share useful records with a healthcare professional.
Key takeaways
- Choose an upper-arm monitor validated for its exact cuff and device combination.
- Match the cuff to your measured mid-upper-arm circumference.
- Rest five minutes, keep your arm supported, and take two readings one minute apart.
- Record the date, time, readings, pulse, and relevant medicines or symptoms.
How do you choose a monitor that can produce useful home readings?
Choose an automated upper-arm blood pressure monitor with a cuff size that matches your measured mid-upper-arm circumference. Also check independent clinical validation for the exact monitor-and-cuff combination, using a current listing from STRIDE BP or ValidateBP rather than relying on a packaging claim such as “accurate.”
Measure around the middle of your upper arm, with the tape level and firm but not tight. Compare that number with the cuff’s printed arm-circumference range; do not assume the supplied cuff fits every adult.
| Cuff fit | Likely effect | What to do |
|---|---|---|
| Too small | Falsely high readings | Use a larger validated cuff |
| Within the printed range | Appropriate starting point | Confirm the monitor-and-cuff combination is validated |
| Too large or loose | Falsely low readings | Refit correctly or choose a suitable cuff |
| Very small or large arm | Supplied cuff may not fit | Find a separately available cuff validated for that monitor |
A cuff that fits the arm but has not been validated with the monitor can still undermine the reading. Ask for the exact model number and cuff reference, not just the monitor brand.
If your arm is very large or very small, buy the separately available cuff only after confirming that the manufacturer validated that size with the device. A pharmacy sale or regulatory clearance does not prove independent clinical validation.
Upper-arm or wrist monitor: which is easier to measure correctly?
An upper-arm monitor is usually easier to measure correctly for routine home monitoring because its cuff position is less sensitive to small posture changes. A wrist blood pressure monitor becomes useful when an upper-arm cuff cannot fit or is unsuitable, but positioning errors can quickly distort the result.
| Option | Positioning demand | Best use |
|---|---|---|
| Upper-arm monitor | Fit the cuff around the upper arm and support the arm at heart level | Routine monitoring for most adults |
| Wrist blood pressure monitor | Hold the wrist at heart level, keep the display facing upward, and follow the manufacturer’s positioning instructions exactly | When an upper-arm cuff cannot fit or is unsuitable |
Choose a clinically validated blood pressure monitor with validation for the exact model and cuff combination. Check the device-specific listings from STRIDE BP or ValidateBP, or find a validation statement that names both the model and cuff.
The word “accurate” on packaging is marketing, not independent validation; regulatory clearance alone does not prove that the device appears on a current validated-device list.
Useful features include:
- An irregular-heartbeat indicator
- Memory for multiple users
- Averaging of stored readings
- A large, easy-to-read display
- Data transfer to a phone or computer
- Operation from both batteries and an adapter
- A cuff you can fit without help
A wrist model is not the easier choice simply because it is smaller. If you cannot keep your wrist at heart level throughout the reading, choose an upper-arm device instead.
How should you prepare and take each home blood-pressure reading?
To take blood pressure at home, avoid caffeine, exercise, and smoking for at least 30 minutes beforehand. Empty your bladder, then follow this rest before blood pressure reading routine:
- Sit quietly for at least 5 minutes with your back supported, feet flat on the floor, and legs uncrossed.
- Put the cuff on bare skin, never over a sleeve. For proper cuff placement, keep its lower edge about 2–3 cm above the elbow crease and align the artery marker as directed.
- Rest your arm on a table so the cuff sits at heart level. Keep still and do not talk while the monitor inflates and deflates.
- Take two readings one minute apart. Record both readings; do not choose the lower result.
| Setup | Correct action | What goes wrong otherwise |
|---|---|---|
| Cuff | Bare upper-arm skin, 2–3 cm above the elbow crease | Clothing or incorrect height can distort the result |
| Body | Back supported, feet flat, legs uncrossed | Tensing or crossed legs can raise the reading |
| Arm | Supported on a table at heart level | A hanging arm can produce a misleading result |
| During measurement | Stay silent and still | Talking or movement can alter the reading |
Record the date, time, both readings, and pulse. Note a recently taken decongestant or stimulant medicine, pain, stress, or another temporary factor that could affect the result. Follow your healthcare professional’s advice about when to measure after that factor.
When should you measure, and what should you record?
For a baseline pattern, follow a home blood pressure monitoring schedule of two readings in the morning and two in the evening for about 7 days, unless your clinician gives you a different schedule. Measure at roughly the same times each day. Follow instructions about measuring before medication or at a specified interval afterward.
Record each reading in a blood pressure log:
| What to record | Details |
|---|---|
| Date and time | Note when each reading was taken |
| Arm used | Use the same arm throughout the monitoring period |
| Blood pressure | Write the systolic and diastolic numbers separately |
| Pulse | Record the beats per minute shown by the monitor |
| Medication timing | Note when you took the medicine in relation to the reading |
| Symptoms | Include dizziness, headache, chest discomfort, or other symptoms |
| Unusual conditions | Note poor sleep, pain, stress, exercise, caffeine, or a decongestant |
A monitor’s averaging function can help you spot a pattern, but keep the individual readings available because an average can hide important variation. Do not select only the lower result.
Bring the blood pressure log and the monitor to an appointment. A clinician can compare the device with a professional monitor and check whether your technique or equipment needs adjustment.
How do you interpret the display and respond to an unexpected result?
The top number is systolic pressure, the pressure when your heart contracts; the bottom number is diastolic pressure, the pressure between beats. Pulse rate is the number of heartbeats per minute.
| Display item | Meaning | What to check |
|---|---|---|
| Systolic | Pressure during a heartbeat | Top number |
| Diastolic | Pressure between beats | Bottom number |
| Pulse | Heartbeats per minute | Pulse rate |
Confirm that blood pressure is shown in mmHg, not another unit. One reading does not establish a diagnosis, so record repeated results and discuss the pattern with your clinician.
An average home pressure around 135/85 mmHg or higher corresponds approximately to the 140/90 mmHg office threshold in many conventional guidelines. Your clinician’s target may differ. Home records can reveal white-coat hypertension, where clinic readings are high, or masked hypertension, where clinic readings appear normal but home readings are high.
An irregular-heartbeat symbol is not a diagnosis. Automated monitors can struggle with atrial fibrillation or frequent ectopic beats, so repeated irregular results need clinical review and possibly manual confirmation. Do not stop, increase, or change medication because of a few readings.
Know the 180/120 blood pressure emergency rule: wait at least one minute and repeat a reading above 180/120 mmHg. If it remains high, seek prompt medical advice. Get emergency care immediately with:
- Chest pain, breathlessness, weakness, numbness, vision change, or difficulty speaking
During pregnancy or pre-eclampsia risk, use a monitor with appropriate pregnancy validation and follow clinical guidance.
What should you confirm before buying or setting up a monitor in Bengaluru?
Before paying, use this blood pressure monitor buying checklist. Ask to see:
- The exact model number, the cuff’s stated arm-circumference range, and the instruction manual.
- The power options: battery type, expected battery use, and whether an AC adapter is included or separately available.
- The written warranty terms, including its duration and the service contact.
- Evidence of clinical validation for that exact monitor-and-cuff combination. Check a listing from ValidateBP or STRIDE BP; “accurate” on the box is not validation.
- A display labelled mmHg for blood pressure. Confirm that memory, averaging, user profiles, and data-transfer functions suit the way you will keep records.
- Availability of a replacement cuff or larger cuff if the supplied cuff does not fit. An unvalidated replacement cuff can undermine an otherwise validated monitor.
During your home monitoring setup, ask the blood pressure monitor supplier Bengaluru buyers use to demonstrate cuff placement, battery or adapter operation, and the validation document.
At Rajendra Surgicals, compare an upper-arm monitor with a wrist model using these questions: choose the upper-arm option for routine use, while a wrist model requires precise heart-level positioning and is better reserved for an unsuitable upper-arm cuff.
Buy the monitor you can position correctly, operate consistently, and explain to your clinician—not the one with the longest feature list.
Related product
 | omron karma OMRON Digital Blood Pressure Monitor An OMRON Digital Blood Pressure Monitor is a reliable and clinically trusted device designed to measure blood... View product → |
Frequently asked questions
How do you choose a monitor that can produce useful home readings?
Choose an automated upper-arm monitor with a cuff that matches your mid-upper-arm circumference. Confirm independent clinical validation for the exact monitor-and-cuff combination through STRIDE BP or ValidateBP.
Is an upper-arm or wrist monitor easier to measure correctly?
Upper-arm monitors are easier to position consistently because the cuff sits at heart level on a supported arm. Wrist monitors require precise heart-level positioning and are more sensitive to posture and movement.
How should you prepare and take each home blood-pressure reading?
Avoid exercise, smoking, caffeine, and a full bladder for 30 minutes beforehand. Sit quietly for five minutes, keep both feet flat, support your back and arm, place the cuff on bare skin, and avoid talking during the reading.
When should you measure, and what should you record?
Measure at consistent times, such as morning before medicines and evening, following your clinician’s instructions. Record the date, time, systolic and diastolic readings, pulse, symptoms, medicines, and unusual circumstances.
How do you interpret the display and respond to an unexpected result?
The higher number is systolic pressure and the lower number is diastolic pressure; the display may also show pulse or an irregular-heartbeat symbol. Repeat an unexpectedly high reading after five minutes of quiet rest. A reading above 180/120 mmHg needs urgent medical guidance, especially with chest pain, breathlessness, weakness, confusion, or vision changes.